Creating a RESTful Service with Java and Jersey with Netbeans
Step-by-step tutorial on creating RESTful services using Java, Jersey, and NetBeans with MySQL.
There are many ways to implement a RESTful service, but what if you need to do it in Java and you use Netbeans? I recently had a project like this and it was quite an experience to get my enviorment up and working. With Java, there are just so many ways to do it that it starts to look like too much to handle. Well it is actually easier than you think. Let’s dive in..
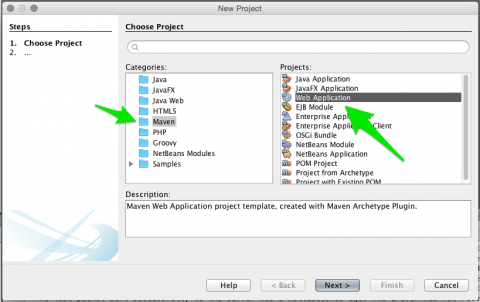
First, fire up Netbeans and create a new Maven Web Application project. Give it a name of you choosing.
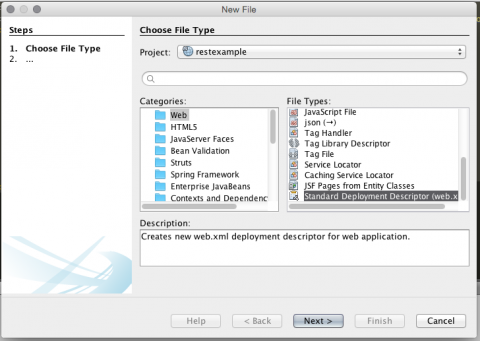
Right off the bat, create a web.xml file by right clicking on the project and creating a new Standard Deployment Descriptor. This is the configuration file for the RESTful service mapping.
And the last configuration step you will need to make before you actally write code is to add the Jersey Dependency. Add these lines to your pom.xml:
<dependency>
<groupId>org.glassfish.jersey.containers</groupId>
<artifactId>jersey-container-servlet</artifactId>
<version>2.0</version>
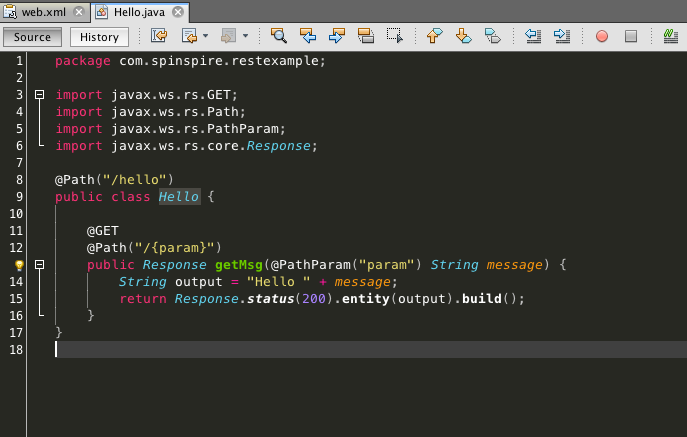
</dependency>Now you can get to writing some code. To begin, create a Java class, name it Hello, and add this code:
import javax.ws.rs.GET;
import javax.ws.rs.Path;
import javax.ws.rs.PathParam;
import javax.ws.rs.core.Response;

@Path("/hello")
public class Hello {

    @GET
    @Path("/{param}")
    public Response getMsg(@PathParam("param") String message) {
        String output = "Hello " + message + "!";
        return Response.status(200).entity(output).build();
    }
}
This simple class will output a simple greeting when you visit the /hello/yourname path.In order for this to work, you must make an addition to your web.xml to map the Java class to the RESTful path. Add this block of code to your web.xml:
<servlet>
  <servlet-name>rest</servlet-name>
  <servlet-class>org.glassfish.jersey.servlet.ServletContainer</servlet-class>
  <init-param>
    <param-name>jersey.config.server.provider.packages</param-name>
    <param-value>com.spinspire.restexample</param-value>
  </init-param>
</servlet>
<servlet-mapping>
  <servlet-name>rest</servlet-name>
  <url-pattern>/api/*</url-pattern>
</servlet-mapping>
Be sure to change the param-value to match your Java class package.
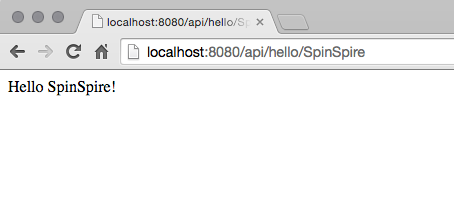
Now run this on your server and head to /api/hello/SpinSpire to see this:
I use Jetty as a server because its simple to use, it recompiles/restarts on save, and its also easy to set up. Open your pom.xml and add this between your plugins tags:
<plugin>
<groupId>org.eclipse.jetty</groupId>
<artifactId>jetty-maven-plugin</artifactId>
<version>9.2.4.v20141103</version>
<configuration>
<httpConnector>
<!-- make jetty listen on 127.0.0.1 for better security -->
<!--host>127.0.0.1</host-->
</httpConnector>
<scanIntervalSeconds>3</scanIntervalSeconds>
<webAppConfig>
<!-- defaultsDescriptor>src/test/resources/jetty-maven-plugin-webdefault.xml</defaultsDescriptor -->
</webAppConfig>
</configuration>
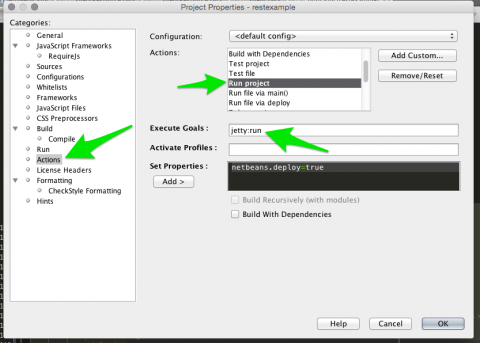
</plugin>Now right click on your project and click properties. Find the Actions tab and then the Run Project action. Change it from “package” to “jetty:run”. It should look like this:
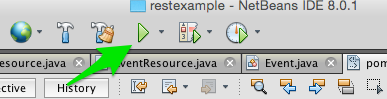
Run the Jetty server simply by hitting the green play button in Netbeans.
Now let’s say you have a database table called Event with an id, title, and created collumns and you want to pull that data from a REST HTTP GET call.
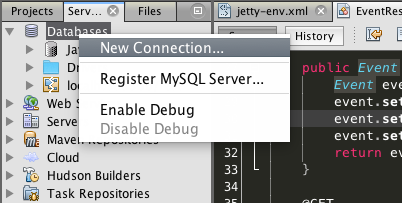
First open the Services tab in Netbeans, right click on Databases, and hit New Connection.
Follow the wizard step by step to setup your database with Netbeans. Once thats done, you will need to let your project know which database to connect to. For Jetty, create a jetty-env.xml inside your WEB-INF folder and add these lines:
<Configure class="org.eclipse.jetty.webapp.WebAppContext">
  <New id="DSTix" class="org.eclipse.jetty.plus.jndi.Resource">
    <Arg>jdbc/DSTix</Arg>
    <Arg>
      <New class="org.apache.commons.dbcp.BasicDataSource">
         <Set name="driverClassName">com.mysql.jdbc.Driver</Set>
         <Set name="url">jdbc:mysql://localhost:3306/rest</Set>
         <Set name="username">yourusername</Set>
         <Set name="password">yourpassword</Set>
         <Set name="validationQuery">SELECT 1</Set>
      </New>
    </Arg>
  </New>
</Configure>
Of course you will have to set your own username and password, and also the url must match the one you created using the New Database Connection wizard.
Next you must add your database drivers to your project, and while we’re at it, a JSON meda writer. Add this to your pom.xml:
<dependency>
  <groupId>commons-dbcp</groupId>
  <artifactId>commons-dbcp</artifactId>
  <version>20030825.184428</version>
</dependency>
<dependency>
  <groupId>commons-pool</groupId>
  <artifactId>commons-pool</artifactId>
  <version>1.6</version>
</dependency>
<dependency>
  <groupId>mysql</groupId>
  <artifactId>mysql-connector-java</artifactId>
  <version>5.1.34</version>
</dependency>
<dependency>
  <groupId>com.fasterxml.jackson.jaxrs</groupId>
  <artifactId>jackson-jaxrs-json-provider</artifactId>
  <version>2.4.0</version>
</dependency>
Now keep in mind that i use a MySQL database, so my configuration and drivers are for MySQL.
That’s it for the database configuration though , so now its time to create an Event model and Event Resource. Create a Java class named Event with the following code:
public class Event {
    private int id;
    private String title;
    private int created;

    public int getId() {
        return id;
    }

    public void setId(int id) {
        this.id = id;
    }

    public String getTitle() {
        return title;
    }

    public void setTitle(String title) {
        this.title = title;
    }

    public int getCreated() {
        return created;
    }

    public void setCreated(int created) {
        this.created = created;
    }
}
and a EventResource class with the following code:
import java.sql.Connection;
import java.sql.PreparedStatement;
import java.sql.ResultSet;
import java.sql.SQLException;
import java.util.ArrayList;
import java.util.List;
import javax.naming.InitialContext;
import javax.naming.NamingException;
import javax.sql.DataSource;
import javax.ws.rs.GET;
import javax.ws.rs.Path;
import javax.ws.rs.Produces;

@Path("/event")
@Produces("application/json")
public class EventResource{

    protected Connection getConnection() throws SQLException, NamingException {
        InitialContext ic = new InitialContext();
        DataSource ds = (DataSource) ic.lookup("jdbc/DSTix");
        return ds.getConnection();
    }

    public Event getFromResultSet(ResultSet rs) throws SQLException {
        Event event = new Event();
        event.setId(rs.getInt("id"));
        event.setTitle(rs.getString("title"));
        event.setCreated(rs.getInt("created"));
        return event;
    }

    @GET
    public List getList() throws SQLException, NamingException {
        List events = new ArrayList<>();
        Connection db = getConnection();

        try {
            PreparedStatement st = db.prepareStatement("SELECT id, title, created from tix_event");
            ResultSet rs = st.executeQuery();
            while (rs.next()) {
                Event e = getFromResultSet(rs);
                events.add(e);
            }
            return events;
        } finally {
            db.close();
        }
    }
}
I’ll take a moment and explain what is going on in the code. Path is set to /event and the media that it will produce is JSON. Event.class is simply the model class, all it does it contain the fields and appropriate getters/setters. EventResource.class is the calss that does the work. Connection is self-explanatory, it just instantiates the connection. getList opens a new connection, then executes a query and populates a List with the returned data, which is rendered as JSON.
Working with Java can be confusing sometimes, but once you setup your enviornment, it becomes a breeze. With the code above, you now have a baseline to work from, and it becomes easy to implement CRUD operations into your project. Attached is a complete project with CRUD operations to a table, feel free to example and use it.
More resources here: